

Defining/Editing a Ribbed Slab
Defining a New Ribbed Slab
Before inserting a Ribbed Slab member its reference axes should be defined.
To define a new Ribbed Slab member:
1. Display the storey level in the drawing area which will contain the slab.
2. Press the “Ribbed Slab” button located in "Modelling" ribbon
3. Edit the fields in the "Ribbed Slab Properties” form > Gen tab.4. Press the “Insertion” tab in the Ribbed Slab Form to access the second page and define the reference point and the direction of the ribs.5. Press the “Loads” tab in the Ribbed Slab Form to access the third page and define the dead and imposed loads of the ribbed slab.6. In either the plan or 3D view, pick the position of the slab. By default, "Beam Region" is set as the insertion method. So, picking a completely enclosed region surrounded by beams and/or walls will be sufficient to define the slab boundaries. For the other insertion methods see the related topics further in this section.
Editing an Existing Ribbed Slab
In order to edit an existing ribbed slab:
Select the ribbed slab.- Right-click and select “Properties”. (“Properties” can be accessed alternatively by pressing the “Ribbed Slab” button).
- Modify the fields such as "Label", dimensions and/or loadings in the "Ribbed Slab Properties” form.
- Press the "Update" button in the form.
You can repeat this process to as many members as you wish. One member at a time can be edited by this method. In order to update several ribbed slabs at once, you can use the "Ribbed Slab Table" in right-click menu.
Ribbed Slab Table
You can use the "Ribbed Slab Table" in right-click menu to modify one or more existing slabs :
-
All cells in the table are editable. You can use the cursor keys or mouse cursor to select a cell and edit the contents.
-
The "Search" button can be used to find a specific member after typing the label to the "Member" field.
-
You can close this dialog window using “Close” button.
All the changes made in this window will be applied without getting back.
Ribbed Slab Load Transfer
ProtaStructure transfers the loads from ribbed slabs automatically assuming each rib transfers loading equally to the supporting beams.

Ribbed Slab Properties
The "Ribbed Slab Properties
" will be loaded when the "
Ribbed Slab
" option in the "
Modelling
" ribbon is selected. A new ribbed slab can be defined by arranging the fields in the form and then by clicking on one or more regions surrounded by axis elements in the plan window.
The “Ribbed Slab Properties” form can also be accessed after selecting an existing ribbed slab and then by right-clicking and choosing the “Properties” option in the shortcut menu. You can select a ribbed slab member by using one of the “Member Selection” methods described previously.
When the “Ribbed Slab Properties” form is open, right clicking a new ribbed slab member and selecting the “Select and Load Properties” option in the shortcut menu will load the properties of the new member in the same window.
The "Ribbed Slab Properties" form has three tab pages named “General”, “Insertion”, and “Loads”. You can shift between the pages by pressing the related tab heading.
General tab
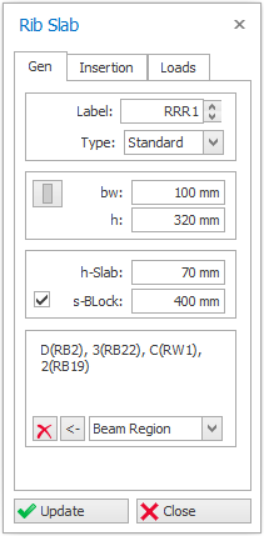
Ribbed Slab Label
The label that will identify the ribbed slab can be entered in this field. This field (after formatting to be a proper label) is limited to 8 characters. A text control spin button exists to the right of the label field to facilitate the creation of successive label text.
As in all member types, the ribbed slab member labels will be listed in the “Structure Tree” under the related storey heading. This list can be used to select a member by label.

Repeating member labels is not permitted in a building. During the insertion of members the program will sound an alarm and a warning note will appear in the status bar if a repeating member label is detected.
Type
You can select Ribbed Slab Type using this field. Options in this field are:
- Standard : Use this option to model monolithic one way Ribbed Slabs that are fixed supported to the storey beams.
- Prefabricated : This type can be used for prefabricated one way Ribbed Slabs. Ribs are hinge connected to the storey beams.
- Grillage : Two way Waffle Slabs can be modelled by this option. Ribs are fixed supported to the storey beams. Only Finite Element Analysis method can be used in the analysis of such systems.
Rib Dimensions and Spacing (bw, h, h-Slab, s-Block)
Width ("bw") and height ("h") of the rib beams, height of slab (or topping) ("h-Slab") and width of blocks (or clear distance between the ribs) ("s-Block") can be defined using these fields.

Insertion Axes
All structural members are inserted based on axis intersections as insertion reference.
Each edge of the slab is defined by an axis. The edges are sorted in counter-clockwise order and listed in "Insertion Axes" frame.
Four methods are available for defining these axes, namely, "Axis Region", "Beam Region", "Pick Axis" and “Pick Points”.
The details of how to use these insertion methods are described below in section "Inserting a Ribbed Slab".
Insertion Tab
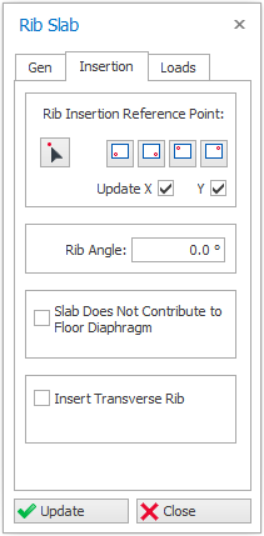
Fields that are used for the orientation of the Rib beams are located in the “Insertion” page of the “Ribbed Slab Properties” form.

Rib Insertion Reference Point & Rib Angle
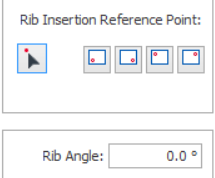
The "Control Point" is used for defining the position of the lower edge (viewing from left to right) of the first rib. One of the following methods can be used to define this point:
- One of the corners of the slab can be selected to be the control point of the ribs by clicking the related corner button. The selected corner is marked with a red dot in these buttons.
- Next to the four corner buttons, four edge buttons are located that defines the direction of the ribs. The direction of the ribs is set perpendicular to the edge marked with the red colour on the button.
- To position the ribs using this method, select the edge button, then press one of the corner buttons and modify (if necessary) the distance and press the "
Update
" button to re-draw the ribs.
Alternatively, when none of the buttons in this form are depressed, set the rib angle by entering the desired value (in degrees) to the "Angle
" field.
" field.
Slab Does Not Contribute To Floor Diaphragm
Usually in the analysis of the building systems, slabs are considered to behave infinitely rigid in their planes, thus, forming rigid diaphragm action.
If “Slab Does Not Contribute To Floor Diaphragm” option in the “Insertion” tab is checked, related ribbed slab will not be participating in the rigid diaphragm action.
By this way, all the nodes linked to the corners of this slab will displace independent of rigid diaphragm. For a complete control over diaphragm formation on a storey level use “Model Options” in “Building analysis” form in the “Analysis” ribbon.
Insert Transverse Rib
The “Insert Transverse Rib” option in the “Insertion” tab is used to individually control the existence of cross ribs. There is a requirement for these (to ensure load sharing) in EC2.

When checked, standard ribbed slabs have one or two transverse direction secondary beam added if the ribs are longer than certain length limits.
The length limits are controlled via the Slab Setting dialog (defaults 4 and 7 m).
Loads Tab
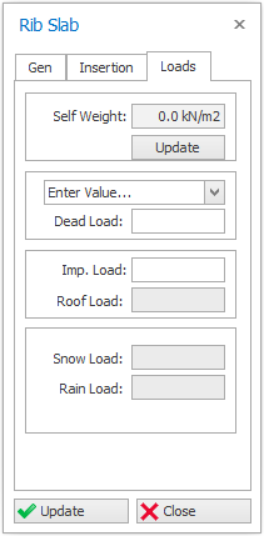
Self Weight
Self-weight (per area) of the ribbed slab will be calculated automatically using the "Unit Weight of Concrete" and "Unit Weight of Blocks" defined in "Project Parameters" section and using the section dimensions of the ribs and slab.
The calculated self weight value cannot be edited by the user. If one of the section dimensions of the ribs or the thickness of the slab is modified or "Self Weight" is zero, then this field will be updated automatically.

If you find the self-weight calculated is wrong, you can use enter a negative value of "Dead Load" is correct this.
Dead Load (Additional)
The calculated weight (per area) in the above field does not include any additional covers.
To add additional weights such as ceiling plaster, fake ceiling, floor finishes, "Dead Load" field can be used.
Imposed / Live Load
The imposed live loads (per area) on the ribbed slab can be defined using this field. Right-clicking on this field will provide access to standard imposed loads defined in the codes.
Inserting a Ribbed Slab
After completing the parameters in the "Ribbed Slab Properties" form you can show the insertion of the ribbed slab using one of the following available methods.
Four methods are available for defining these axes, namely, "Axis Region", "Beam Region", "Pick Axis" and “Pick Points”.
The selection of ribbed slab insertion methods can be accessed using the "Insertion" button in the "Ribbed Slab Properties" window.
Axis Region
When "Axis Region" method for defining slab insertion is selected, insertion axes can be defined simply by picking a point surrounded by axes.
If there are more than one region (surrounded by axes) within a ribbed slab panel, then successive points can be picked by pressing (and holding down) the "Ctrl" key while picking points. The regions must be selected one by one using an adjacent region every time. The insertion of the ribbed slab will be completed when the "Ctrl" key is released.

Ribbed Slab Insertion Using "Axis Region"
The insertion axes will appear in the "Insertion Axes" frame during picking.
It’s difficult to apply this method of ribbed slab insertion in the case of increasing number of regions.
Beam Region (Default)
This is the simplest method for inserting a ribbed slab. If the slab is completely surrounded by beams and/or walls then this method can be used. Just pick a closed area (surrounded by beams and/or walls) to insert the ribbed slab.

Ribbed Slab Insertion Using "Axis Region"
Pick Axis
"Pick Axis" method can be used as a third ribbed slab definition method. In this method, you can define the ribbed slab by picking the axes surrounding the slab.
To insert a new slab using this method :
- First select “Pick Axis” and then pick the axes in any order (counter-clockwise or clock-wise) starting from any axis and finally re-select the first axis you have shown to end the insertion action.
- The new slab will be inserted to the region surrounded by the selected axes.
- Then, the insertion axes in the "Slab Insertion" frame should be cleared by click "Delete All Axes" in order to define a new slab.

The ribbed slab will not be inserted in the defined region if it is not appropriate for a slab insertion (i.e. crossed by some other members).
This method can be used when the other methods (especially “Beam Region” or “Axis Region”) are difficult to apply.
Pick Points
"Pick points" method can be used as a fourth ribbed slab definition method.
- In this method, you can define the ribbed slab by picking the axis intersection points around the perimeter of the slab. For simple boundaries this option requires one less click per ribbed slab than the “Pick Axis” option.
- To insert a new ribbed slab using this method; after pressing the “Insertion” button in the "Slab Properties" window, select “Pick Points” method.
- Then, select an axis intersection point and continue selecting axis intersection points around the perimeter of the ribbed slab as required.
- As soon as you click an intersection where an axis is found that goes back to the start point the slab is inserted.
This efficient method can be used on simply defined / regular shaped slab.
In the case of an error while using this method, all previously defined axes can be deleted by pressing the “Delete All Axes” button then you can restart the definition of the slab. For example calculation and decomposition of loads on ribbed slab refer to: ProtaStructure Rib & Waffle Slab Loads Design Guide